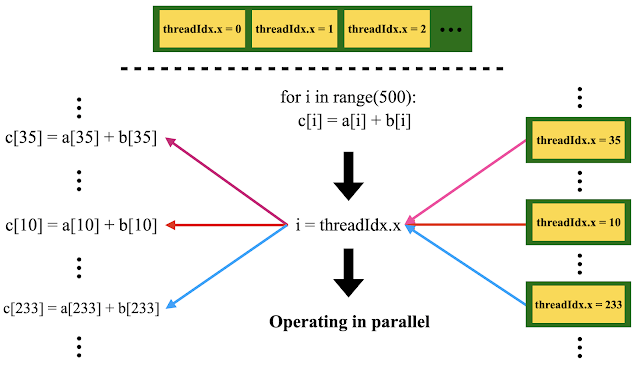
First of all, we may need a review for the very basic CUDA programming and GPU execution principle. Here, I want to use the diagram below to demonstrate the threadings on GPU with a very simple array addition operation example.

In this simple case, we only have a single block on GPU, which contains, say, 500 threads (the actual number of threads may be larger than 500 but in this example, we only need 500 of them). The part above the dashed line refers to the single block. The for loop in the middle of the bottom half is usually what we do for coding in the array addition task. Basically, we loop over all the 500 indexes to do the addition one-by-one in a serial manner. Using GPU, the working scheme is different. Instead of a single ‘worker’ executing our commands one after another, we now have a whole bunch of ‘workers’ ready at the same time, waiting for our commands so that they can do their own job, independently. Each ‘worker’ has his/her unique ID - the location within the grid-block-thread organization we talked about in previous note (Click me to transfer there). At the beginning of the workflow, we let each ‘worker’ shout out their unique ID (‘threadIdx.x’ in the diagram above). Then we decide which part of the job to assign to each specific ‘worker’ (the assignment ‘i = threadIdx.x’ in the diagram above). After that, each ‘worker’ knows exactly what he/she is responsible for and then goes directly to do job (e. g. ‘c[35] = a[35] + b[35]’ in the diagram above). Here, the diagram only shows the working mechanism on GPU and the data copying in between the host (CPU) and the device (GPU) is not shown. Basically, copying data (the array ‘a’ and ‘b’ here) from host to device is analogous to trucks delivering materials to the factory (the device, our GPU) and copying data (the resulted array ‘c’ here) from device back to host is analogous to factory delivering products to the boss (the host, CPU).
Since each ‘worker’ has his/her own unique ID with which we can assign a unique task for each of them. Therefore, the actual order of the job to be carried out does not really matter that much. That’s why we see that in the diagram above, the #35 part of the job is shown above #10. This is just to demonstrate the idea that order here does not matter. In practice, they all happen in parallel and no one really knows or cares which one of them gets executed/finished first.
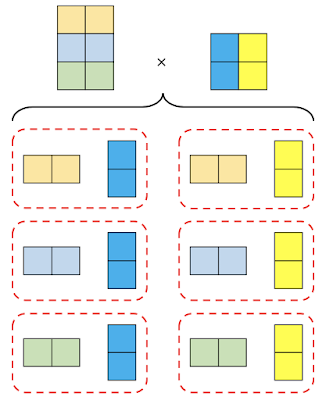
Based on the further discussion above, we now move on to a slightly complicated case, where we are going to do matrix multiplication with GPU. First, the basic principle of conducting matrix multiplication is shown in the following picture,

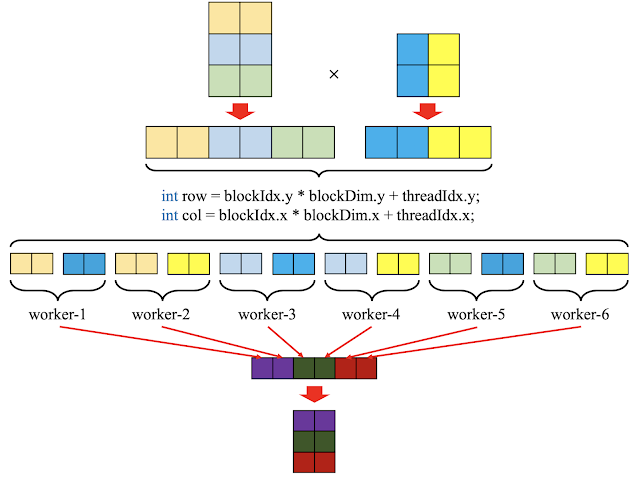
To conduct the matrix multiplication in a parallel way on GPU, the fundamental idea is to execute each of the block within dashed boxes, independently on individual thread on GPU. To realize that, the basic workflow is presented in the following picture,

Following the coding scheme as presented above, the fundamental difference as compared to usual serial coding here is that we represent the matrix in a one-dimensional manner, as indicated by the red arrows on the top of the figure above. The purpose of such a representation is for the ease of coding on GPU kernel, as we will see in the code snippet that will be presented later in current blog. Once we transform our matrix to its one dimensional form, the next step is again to let ‘workers’ shout out their unique ID, as we have discussed above. In this case, for demo purpose, assume we have a single block which contains (3\times2) thread structure, then in practice we have a one-to-one mapping between ‘workers’ and the entries of the final product matrix, i. e. each ‘worker’ is responsible for one entry in the final product matrix and none of them is wasted. The reason why we want to point out ‘none is wasted’ is that in practice, it often happens the overall GPU block unit is larger than what we really need. For example, in current example, if we claim a single GPU block with (5\times4) thread structure, we can still find right amount of ‘workers’ to do jobs for us, but in this case, for sure some of the ‘workers’ will not be assigned jobs, thus ‘wasted’. Back to our workflow, once all ‘workers’ know what they are responsible for, they can go ahead to do their jobs, i. e. multiplying the right row and column of the input matrices and sum up the result to obtain the entry for the final product matrix, as indicated by the part of the diagram above containing a whole bunch of grouped (by ‘worker’) squares.
The explanation presented above about matrix multiplication with CUDA is based on the original blog post in Ref. [1]. Also, the code snippets there are reproduced here in current blog, with detailed comments for better understanding. A makefile, together with instructions about how-to, is also provided at the end of current blog, with which one can straightforwardly compile the code given below.
main_mat_mul.cu
1 2 3 4 5 6 7 8 9 10 11 12 13 14 15 16 17 18 19 20 21 22 23 24 25 26 27 28 29 30 31 32 33 34 35 36 37 38 39 40 41 42 43 44 45 46 47 48 49 50 51 52 53 54 55 56 57 58 59 60 61 62 63 64 65 66 67 68 69 70 71 72 73 74 75 76 77 78 79 80 81 82 83 84 85 86 87 88 89 90 91 92 93 94 95 96 | #include <iostream> #include <vector> #include <stdlib.h> #include <time.h> #include <cuda_runtime.h> #include "kernel.h" #include "kernel.cu" #include "dev_array.h" #include <math.h> using namespace std; int main() { // Perform matrix multiplication C = A * B // where A, B and C are NxN matrices. int N = 16; int SIZE = N*N; // Allocate memory on the host. vector<float> h_A(SIZE); vector<float> h_B(SIZE); vector<float> h_C(SIZE); // Initialize matrices on the host. for (int i=0; i<N; i++){ for (int j=0; j<N; j++){ h_A[i*N+j] = sin(i); h_B[i*N+j] = cos(j); } } // Allocate memory on the device. The 'dev_array' refers to a class // defined separately in the 'dev_array.h' file - refer to the header // list on top of current file. dev_array<float> d_A(SIZE); dev_array<float> d_B(SIZE); dev_array<float> d_C(SIZE); // The 'set' method defined in the 'dev_array.h' file is responsible for // copying data from host to device. Here, the first parameter '&h_A[0]' or // '&h_B[0]' is a pointer specifying the starting position in memory to // copy from. The second parameter 'SIZE' specifies the number of 'blocks' // we will copy. Detailed explanation about 'block' will be given in the // 'dev_array.h' file (refer to the definition of 'set' method there). d_A.set(&h_A[0], SIZE); d_B.set(&h_B[0], SIZE); // Now, we do the matrix multiplication on GPU, by calling the function // below, which is defined in another separate .cu file - 'kernel.cu' in // the header of current file. Within 'kernel.cu' file, the fundamental // kernel function will be defined and called, which is the real part that // is executing the matrix multiplication. Therefore, the calling scheme // can be roughly depicted as follows: // // call call // Current file -----> matrixMultiplication -----> kernel // matrixMultiplication(d_A.getData(), d_B.getData(), d_C.getData(), N); cudaDeviceSynchronize(); // The 'get' function is also defined in 'dev_array.h' file, as the 'set' // function above. It is responsible for copying data from device to host. d_C.get(&h_C[0], SIZE); cudaDeviceSynchronize(); // Next, we are going to do the same thing as above, i. e. matrix // multiplication. This time, we will be doing it on CPU only. float *cpu_C; cpu_C=new float[SIZE]; // This is the familiar way of doing matrix multiplication in a serial // manner on CPU. float sum; for (int row=0; row<N; row++){ for (int col=0; col<N; col++){ sum = 0.f; for (int n=0; n<N; n++){ sum += h_A[row*N+n]*h_B[n*N+col]; } cpu_C[row*N+col] = sum; } } // Compare GPU and CPU calculation results, for the same job. double err = 0; for (int ROW=0; ROW < N; ROW++){ for (int COL=0; COL < N; COL++){ err += cpu_C[ROW * N + COL] - h_C[ROW * N + COL]; } } cout << "Error: " << err << endl; return 0; } |
dev_array.h
1 2 3 4 5 6 7 8 9 10 11 12 13 14 15 16 17 18 19 20 21 22 23 24 25 26 27 28 29 30 31 32 33 34 35 36 37 38 39 40 41 42 43 44 45 46 47 48 49 50 51 52 53 54 55 56 57 58 59 60 61 62 63 64 65 66 67 68 69 70 71 72 73 74 75 76 77 78 79 80 81 82 83 84 85 86 87 88 89 90 91 92 93 94 95 96 97 98 99 100 101 102 103 104 105 106 107 108 109 110 111 112 113 114 115 116 117 118 | #ifndef _DEV_ARRAY_H_ #define _DEV_ARRAY_H_ #include <stdexcept> #include <algorithm> #include <cuda_runtime.h> // Template of type - it's just like a place holder, specifying the declared // variable is of SOME type (not known when being declared). Only when the // declared variable is used do we know what its type is. // See the following site for detailed explanation: // http://www.cplusplus.com/doc/oldtutorial/templates/ template <class T> class dev_array { public: // Refer to the following link for explanation about 'explicit': // https://stackoverflow.com/questions/121162/what-does-the-explicit-keyword-mean // // Here follows we can find explanation about the functionality of ":": // https://stackoverflow.com/questions/2785612/c-what-does-the-colon-after-a-constructor-mean // // Basicaly, we are initializing variables here. explicit dev_array() : start_(0), end_(0) {} // Refer to the following link for explanation about data type 'size_t': // https://en.cppreference.com/w/cpp/types/size_t explicit dev_array(size_t size) { // The 'allocate' function is responsible for allocating memory on // GPU - refer to the definition of 'allocate' function in the end of // current file - the private functions part. allocate(size); } ~dev_array() { free(); } // Both the variables 'start_' and 'end_', as we will see later in current // file, are pointers - 'start_' points to the starting position (in // memory) and 'end_' points to the end. Therefore, the function defined // here follows returns the size of the allocated array on GPU. // Refer to the following site for explanation about const member function // (i. e. the 'const' keyword after the function name below): // https://docs.microsoft.com/en-us/cpp/cpp/const-cpp?view=vs-2019 size_t getSize() const { return end_ - start_; } // Return the starting position in memory, as a pointer. T* getData() const { return start_; } // Function responsible for copying data from host to device. 'start_' // specifies where the copied data will start on device; 'src' specifies // the source of the copying on host; 'sizeof(T)' specifies the unit of // the copied block and 'min' here gives how many such units of block will // be copied. void set(const T* src, size_t size) { size_t min = std::min(size, getSize()); cudaError_t result = cudaMemcpy(start_, src, min * sizeof(T), cudaMemcpyHostToDevice); if (result != cudaSuccess) { throw std::runtime_error("failed to copy to device memory"); } } // Similar to the 'set' function above. In this case, we have the copy // direction reversed - from device to host. void get(T* dest, size_t size) { size_t min = std::min(size, getSize()); cudaError_t result = cudaMemcpy(dest, start_, min * sizeof(T), cudaMemcpyDeviceToHost); if (result != cudaSuccess) { throw std::runtime_error("failed to copy to host memory"); } } private: // Allocate memory on device. The starting position in memory on device will // be returned as a pointer. void allocate(size_t size) { cudaError_t result = cudaMalloc((void**)&start_, size * sizeof(T)); if (result != cudaSuccess) { start_ = end_ = 0; throw std::runtime_error("failed to allocate device memory"); } end_ = start_ + size; } // Free memory on device. void free() { if (start_ != 0) { cudaFree(start_); start_ = end_ = 0; } } T* start_; T* end_; }; #endif |
kernel.h
1 2 3 4 5 6 | #ifndef KERNEL_CUH_ #define KERNEL_CUH_ void matrixMultiplication(float *A, float *B, float *C, int N); #endif |
kernel.cu
1 2 3 4 5 6 7 8 9 10 11 12 13 14 15 16 17 18 19 20 21 22 23 24 25 26 27 28 29 30 31 32 33 34 35 36 37 38 39 40 41 42 43 44 45 46 47 48 49 50 51 52 53 | #include <math.h> #include <iostream> #include "cuda_runtime.h" #include "kernel.h" #include <stdlib.h> using namespace std; // This is where the real magic is happening - the matrix multiplication on GPU // in a parallel manner. __global__ void matrixMultiplicationKernel(float* A, float* B, float* C, int N) { // Here, 'workers' are assigned task, according to their unique ID. // N. B. the way used here to assign rows and columns for 'workers' // guarantee that no two 'workers' will be assigned the same row and column // at the same time. int ROW = blockIdx.y*blockDim.y+threadIdx.y; int COL = blockIdx.x*blockDim.x+threadIdx.x; float tmpSum = 0; // Now each 'worker' knows exactly what he/she is responsible, it's time // for them to do their jobs, individually. if (ROW < N && COL < N) { for (int i = 0; i < N; i++) { tmpSum += A[ROW * N + i] * B[i * N + COL]; } } C[ROW * N + COL] = tmpSum; } void matrixMultiplication(float *A, float *B, float *C, int N) { // Here, we use 'dim3' type variables for declaring the number of blocks // per grid and the number of threads per block. // Refer to the following link about 'dim3' in CUDA: // https://codeyarns.github.io/tech/2011-02-16-cuda-dim3.html // or // https://docs.nvidia.com/cuda/cuda-c-programming-guide/index.html dim3 threadsPerBlock(N, N); dim3 blocksPerGrid(1, 1); // The IF statement guarantees that we have at most 512 threads per block. if (N*N > 512){ threadsPerBlock.x = 32; threadsPerBlock.y = 16; blocksPerGrid.x = ceil(double(N)/32); blocksPerGrid.y = ceil(double(N)/16); } matrixMultiplicationKernel<<<blocksPerGrid,threadsPerBlock>>>(A, B, C, N); } |
========================I AM A SEPARATOR========================
To compile the codes given above, one may want to first save each individual snippet to a separate file (with file name as exactly given on top of each snippet) and also guarantee that all files stay in the same folder. Then one can use the makefile given below to compile the codes to get the executable, by simply executing ‘make’ on terminal.
Makefile
1 2 3 4 5 6 7 8 9 10 11 12 | NCC=nvcc OBJ=kernel.o main_mat_mul.o mat_mul: $(OBJ) $(NCC) -o $@ $^ main_mat_mul.o: kernel.o $(NCC) -c main_mat_mul.cu kernel.o: $(NCC) -c kernel.cu |
References
[1] https://www.quantstart.com/articles/Matrix-Matrix-Multiplication-on-the-GPU-with-Nvidia-CUDA/