There are indeed instructions and tutorials about how to build conda packages (which we can then install easily through conda, e. g. by simply executing ‘conda install …’ from command line) with conda recipe. However, as a beginner to conda build, it was really difficult for myself to find the way out of pieces of information all over the place. I was trying to find a minimal example which then I can use as a template for further tweaking and potentially adding in new things according to my pwn need. It turns out that I could not find such a working example, and that’s what this blog is really for - just to provide a very minimal working example to demonstrate the basic work flow of conda build.
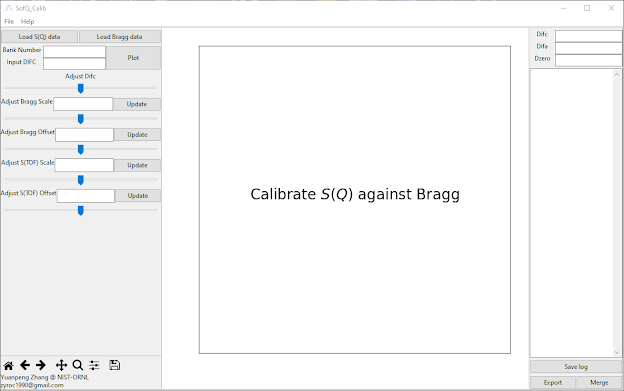
Here follows is a screenshot of the demo program, with which one can calibrate the total scattering in reciprocal space with the corresponding Bragg pattern.

One can install this program by executing the following command from terminal,
conda install -c apw247 sofq_calib
Next, I will share all the configurations necessary for making the easy installation of this program possible, with conda. First, the actual codes are included here: sofq_calib.zip, which has the following tree structure,
.
├── LICENSE.txt
├── README.txt
├── setup.py
└── sofq_calib
├── __init__.py
├── sofq_calib.py
├── stuff
│ ├── doc.txt
│ └── help.txt
│ └── icon.ico
One should save the top-level unzipped folder as ‘sofq_calib’. In this folder, we have all files relevant to running the GUI shown above. Besides that, one can also notice a ‘setup.py’ file - this is actually the file that is really doing the packaging job. Later on, conda recipe will try to get access to this folder and fundamentally to this ‘setup.py’ file to kick off the packaging process.
Given the source codes above, we now turn to the conda build side. Here one can find the package containing all components relevant to conda build: sofq_calib_conda_recipe.zip which has the following tree structure,
.
sofq_calib_conda_recipe
├── bld.bat
├── build.sh
├── icon.ico
├── menu-windows.json
└── meta.yaml
One can find detailed introduction about conda build recipe following the link: Click Me! Several things need to be specifically mentioned here - it is NOT necessary to save the top-level folder as the name appearing here; within the top-level folder, several files need to be with exactly the name as shown: bld.bat, build.sh, ‘menu-windows.json’ and ‘meta.yaml’; the ‘bld.bat’ and ‘build.sh’ are scripts to kick off the packaging, respectively on Windows and Unix-like OS; the ‘meta.yaml’ file contains necessary configurations (metadata) guiding the packaging engine to do what we want it to do. One can refer to the link here for more information about ‘meta.yaml’ file: Click Me; the build script and the YAML file are the minimal requirement for a successful packaging.
For current example, apart from the very basic packaging, we also have included a useful feature - on Windows platform, when users install our package, a corresponding shortcut will be generated both on Desktop and in the Windows start menu. To make this possible, we need two extra files in the conda build folder - one is obviously the icon file (‘icon.ico’ in the folder above) and the other one is ‘menu-windows.json’. Accordingly, in the ‘bld.bat’, we have entries responsible for copying both the ‘icon.ico’ and ‘menu-windows.json’ files into the right place with the right name (‘menu-windows.json’ will be renamed as ‘package-name.json’ where ‘package-name’ refers to the name of our package and in this case, it is ‘sofq_calib’). Here following is the relevant contents in the build script,
set MENU_DIR=%PREFIX%\Menu
if not exist (%MENU_DIR%) mkdir %MENU_DIR%

copy %RECIPE_DIR%\icon.ico %MENU_DIR%
if errorlevel 1 exit 1

copy %RECIPE_DIR%\menu-windows.json %MENU_DIR%\sofq_calib.json
if errorlevel 1 exit 1
where the environment variable ‘%PREFIX%’ refers to the top-level folder of corresponding conda environment. One can find out where it is, by typing ‘conda info’ in terminal. Then both files mentioned above concerning Windows menu entry will appear under the ‘%PREFIX%\Menu’ folder once the package is successfully installed.
In the ‘menu-windows.json’ file is given the properties of the shortcut that will be created for the installed package on Windows. The content is reproduced here,
{
    "menu_name": "Anaconda${PY_VER} ${PLATFORM}",
    "menu_items":
    [
        {
            "name": "SofQ_Calib",
       "pywscript" : "${PYTHON_SCRIPTS}/sofq_calib-script.pyw",
       "icon": "${MENU_DIR}/icon.ico",
       "desktop": true
   }
    ]
}
where each entry within the ‘menu-items’ should be self-explaining. Attention here to the ‘pywscript’ entry which specifies the script that will be launched when double-clicking the shortcut. The full target entry of the shortcut (right click the shortcut → select [Properties] to see/change the target) will become,
C:\Users\yuanp\anaconda3\pythonw.exe C:\Users\yuanp\anaconda3\cwp.py C:\Users\yuanp\anaconda3 C:\Users\yuanp\anaconda3\pythonw.exe C:\Users\yuanp\anaconda3\Scripts\sofq_calib-script.pyw
One does not need to worry about the ‘sofq_calib-script.pyw’ file appearing here. This is a file that is automatically generated during the conda package building/installation procedure and also ‘-script.pyw’ is automatically appended to the end of package name to give the corresponding script name of ‘sofq_calib-script.pyw’. The purpose of generating such a file is to disable the command window popup specifically on Windows. Accordingly, in the YAML file, the entry point under the ‘app:’ block should also be specified as ‘pythonw -m sofq_calib.sofq_calib’, where ‘pythonw’ means the script will be executed by pythonw instead of python. The first ‘sofq_calib’ refers to the package name and the second ‘sofq_calib’ means the script to be executed - remember the ‘-script.pyw’ to be appended to the script file name to give ‘sofq_calib-script.pyw’, as already mentioned above.